CIDNET facilitates voice, video and mail services between the inmates and approved contacts. To start using CIDNET services, you must create a CIDNET account first. By the way, how to create a CIDNET account? Find out its way by reading this entire article.
Create a CIDNET Account
Here are steps by steps to register your account:
- At the first step, visit customer.cidnet.net in your choice browser.
- After that, click the “Register” button.
- Then, you can type in your Email.
- Choose your Time Zone.
- Enter your first and last name.
- Now, simply you can click the “Create Account” button.
- Next, read the Terms of Use carefully, and click Agree.
- To verify your account, you can login to your email. Please open the CIDNET email.
- In the email, you must click the “Click Here” link to complete your verification.
- Enter a Security PIN. You will be asked to choose questions as well provided with your answers.
- Enter your password. And, confirm your password.
- Lastly, click the “Sign In” button.
Complete Your Account
Please complete your account by following some instructions below.
- Once logging in, you can click the Menu (≡) icon in the top corner.
- Then, click the “Account” button
- Please click the “General Information” button.
- After that, you will be asked to enter your personal information such as your birth date, address, city, State, and ZIP. For note: the officers use this personal information to verify your identity. If not providing this information, you will not be allowed to contact your inmate.
- To save your personal information, click the “Save” button.
- Please click the “Photo ID” button.
- Please click the “Upload New” button.
- Click the “Browse” button.
- Select an image of your government-issued ID.
Link With Your Inmate
Please follow these steps to link with your inmate.
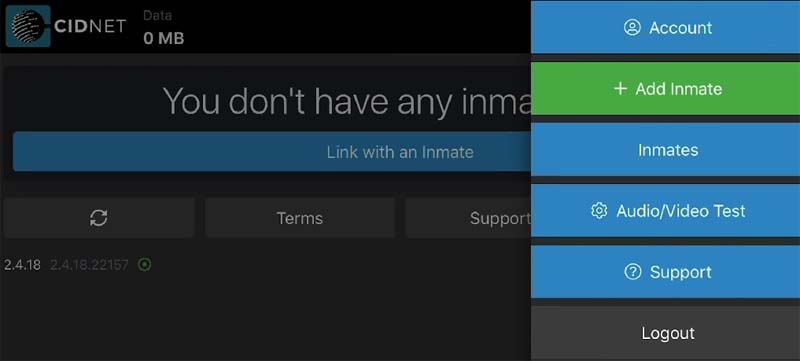
- From the main screen of your CIDNET account, click the Menu (≡) icon.
- Then, click the “Add Inmate” button.
- Choose the State where your inmate resides. Click Next.
- Choose the Facility where your inmate resides. Click Next.
- Search for your inmate by entering first name, and/or last name. Click Next.
- Choose your inmate and click Next.
- Now, you can choose your relationship between you and your inmate.
- Please click the “Complete” button to finish your request.
For note: The correctional facility will decide whether to approve or decline your request. Keep in mind that CIDNET has no control over whether you will be approved or declined. For more information, you should contact the correctional facility.
Audio and Video Test
Before you start communicating with your inmate, facility staff need time to process your request. While you wait to be approved, try testing your device for audio and video compatibility.
- From your account, click the Menu (≡) icon in the top corner.
- Then, click the Audio/Video Test button.
- If you are asked to allow access to your camera and microphone, just click the Allow button.
Purchase Data (MB)
After you run the audio/video test, now time is for you to purchase data.
- Once logging in, click the Menu (≡) icon in the top corner.
- Please click the “Add Data.”
- You can use the Data Calculator to determine how many MB (Data) you need.
- Enter the MB of data you want to purchase. Click Next.
- Afterwards, enter Payment Details.
- Please read the terms of use. Check the boxes, and click the “I Agree” button.
- Review details of your purchase. Click the “Submit” button to process your transaction.
If you have any questions about creating a CIDNET account and other information related to CIDNET services, you can choose the “Support” option. Choose a category, and provide a description. Please be as clear as possible so that the CIDNET support team can help you quickly.

A bookworm and researcher especially related to law and citizenship education. I spend time every day in front of the internet and the campus library.