The Cidnet FAQ greatly assists users in resolving issues that arise while working with Cidnet. On the FAQ page, they can find any educational resources, helpful information, and effective guides that allow them to obtain quick and appropriate solutions for every Cidnet issue.
Of course, if you’re using Cidnet to communicate with an inmate but are facing any issues, you can really go to the Cidnet FAQ page that you can access on the official website of Cidnet. Thankfully! We’ve discovered what you can find on the Cidnet FAQ page in this post. Let’s check them out!
Managing Your Cidnet Account
Cidnet actually provides helpful information regarding how to create your account, including verifying your account and phone number, adding an inmate to your account, and uploading a photo to your profile.
Here’s what the Cidnet FAQ informs us about it!
1. Creating Your Cidnet Account
If you find it a little bit difficult to create an account on Cidnet, you shouldn’t worry since Cidnet will completely inform you. Here’s how!
- First, go to the Cidnet website at https://cidnet.net/.
- Once you’re at the Cidnet homepage, you can click “Register.”
- On the next page, you’ll have to enter your email, time zone, and first and last name.
- Then, choose the state and facility where an inmate is incarcerated.
- Make sure to read and accept the “Terms of Use.”
- After that, you can open your email, which contains a link to verify your account. If you don’t see the email, you can check the spam folders
- If you receive a link, you can click it.
- When prompted, you need to enter your security PIN.
- Select two security questions and their answers.
- You can then create your own password and click “Sign In.”
Congratulations! You’ve already created a Cidnet account, and you can use all of its services.
2. Verifying Your Phone Number
In order to receive a call from an inmate, you definitely need to add your phone number to your account. After adding your phone number, you also have to verify it. Here’s how!
- From your Cidnet’s profile page, you can choose the menu icon in the top-right corner of the screen.
- Here, you can select the “Account” and “Phone Numbers” section.
- To add a phone number, you can click “Add Phone Number.”
- Make sure to choose the verification type, either “text” or “call.”
- If you choose “text,” you’ll receive a 6-digit verification code via text message.
- If you choose “call,” you can receive a 6-digit verification code via phone call.
- After you receive the code, you can enter it on the Cidnet website.
- Then, click “Verify.”
Well, that’s how to verify your phone number on Cidnet.
3. Uploading Your Photo ID
You can also upload your photo ID to make it easier for an inmate to identify your account. Here’s how!
- From your Cidnet’s profile page, you can choose the menu icon in the top right of the screen.
- Here, you can choose “Account”.
- On the following screen, you can choose “Photo ID.”
- Then, click “Browse.”
- Make sure to allow your browser access to your camera roll.
- After that, you can select a picture of your government-issued photo ID.
- Last, you can click “Upload Photo.”
Well, you’ve added your photo ID to Cidnet’s profile.
4. Adding An Inmate to Your Account
To make it approved for you to communicate with your loved one in prison, you can then add them to your account. Here’s how!
- From your profile page, choose the menu icon in the top right of the screen.
- Here, you can choose the “Add Incarcerated Person” section.
- On the following page, you can choose the state in which the inmate is incarcerated and click “Next.”
- Make sure to choose the facility where the inmate currently resides and click “Next.”
- Then, choose the correct inmate and click “Next.”
- Last, you can select the correct relationship with the inmate and click “Complete.”
Okay, that’s how to add an inmate to your Cidnet account.
Using Cidnet Services
Cidnet definitely allows family and friends to stay connected with an inmate through its services, including voice, video, and mail. Of course, not all facilities use the Cidnet system, and the services available at jails will vary.
If you want to know whether or not the facility uses Cidnet and what Cidnet services are available at the facility where the inmate is incarcerated, you can contact the facility directly for further information.
Here’s a list of guidelines for using Cidnet services!
1. What is a CUE?
When you are using Cidnet, you will be familiar with CUE. So, what is it? CUE stands for Cidnet Utilization Event, a system that allows you to connect with an inmate, whether via Cidnet’s Voice, Video, or Mail apps. CUEs are unique since they depend on data rather than minutes.
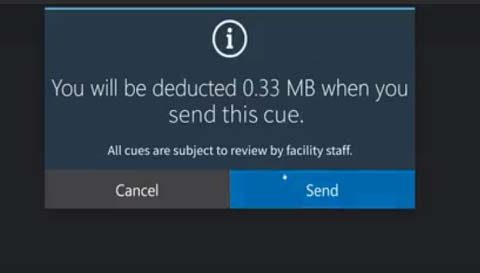
2. How Do You Send a Mail CUE?
To send a mail CUE, you can do the following steps:
- From your Cidnet profile page, you can choose “Mail.”
- Then, choose the correct inmate.
- After that, you can click in the textbox and type your CUE.
- If you’re ready to send a mail CUE, you can click on the paper airplane icon.
- Make sure to confirm that you want to send the CUE.
If you want to read a CUE, you can click on the CUE and then confirm that you want to read it.
3. How Do You Send a Picture CUE?
In addition to sending a message, you can also send a picture through CUE. Here’s how!
- From your Cidnet profile page, you can then choose “Mail.”
- Then choose the correct inmate and click into the textbox that appears on the screen.
- You’ll then see a camera icon at the bottom left corner of the screen, so click it.
- You can select the photo you want to upload.
- If you’re ready to send a picture CUE, you can click on the paper airplane icon.
- Make sure to confirm that you want to send the CUE.
4. How Do You Make a Schedule for a Local Video CUE?
Through CUE, you can also do a video visit, so you can directly see your loved one on the screen. However, you’ll have to make a schedule first, and here’s how!
- From your Cidnet profile page, you can choose “Videos” and “New Schedule.”
- Then, you can select “Local” for an inmate you want to do a video visit with.
- After that, you need to choose a date and duration. Then, click “Next.”
- You can also choose your desired slot, which is available, and then click “Next.”
- Make sure to agree to the disclaimer and compatibility disclaimer.
- Last, you can click “Complete.”
It’s important to note that you have to arrive at the facility 15 minutes ahead of your scheduled visit.
Technical Guidance for Using Cidnet Services
There might be some technical guidance that you need when using Cidnet services. Here are some of them:
1. How Do You Block an Inmate?
For some reasons, you may want to block an inmate from your list. To do so, you can conduct the following steps:
- From your Cidnet profile page, you can choose the menu icon in the top right of the screen.
- Then, you can choose the “Incarcerated Persons” section.
- Make sure to select the correct inmate.
- Here, you can click “Block” and confirm that you want to block this inmate.
2. How Do You Unblock an Inmate?
If you can block an inmate from your list, you can also unblock them. However, doing it is not as simple as blocking them. To unblock an inmate, you’ll need to contact Cidnet Support. Then, you can leave a ticket through the “Support” button on the main account page. Make sure to tell them clearly that you want to unblock an inmate.
3. How Do You Transfer Data to an Inmate?
To receive a call from your loved one in prison, you can transfer data to an inmate. Of course, it’s pretty easy to do so. Here’s how!
- From your profile page, you can choose “Transfer Data.”
- Then, choose an inmate you’d like to transfer data to.
- After that, you can enter the amount of data you want to transfer. Then, click “Next.”
- Make sure to agree to the “Transfer Terms” and choose “I agree.”
- Last, you can click “Submit.”
It’s important to note that not all facilities can allow you to transfer data.
4. How Do You Get a Buyback on Your Data?
When an inmate has been moved to another facility that does not use Cidnet, you can buy back your data. Of course, you can do that, but it may take a long time. However, you can try to make a request for a data refund by performing the following steps:
- From your Cidnet profile page, you can choose “Support” and “New Request.”
- For the category, you can select “I would like to sell back my unused data.”
- Make sure to write a brief description of why you want to refund your data.
- Last, click “Submit.”
It’s important to note that your request will be sent to and processed by Cidnet’s finance department. Well, funds can either be refunded to your account or sent in the form of a check that will be delivered to the listed address on your account. You may need to wait 5 days from your most recent transaction before you submit a buyback request.
5. Can You Get Credited for Declined Cues You Sent?
Unfortunately, no! You cannot get credit back to your account for either a declined mail or picture CUE. Well, your data has been used after a CUE is sent, whether your CUE has been approved or denied by the facility. However, there’s no direct way to undo data usage.
6. How Long Will Your Contact Request Be Pending?
Usually, Cidnet will approve your contact request within 1-2 days of submission. However, it may depend on the facility’s and staff’s availability to proceed with your request.
Fix Problems
When working with Cidnet, you may face some issues. Well, if you happen to encounter one, you can try to get solutions as follows:
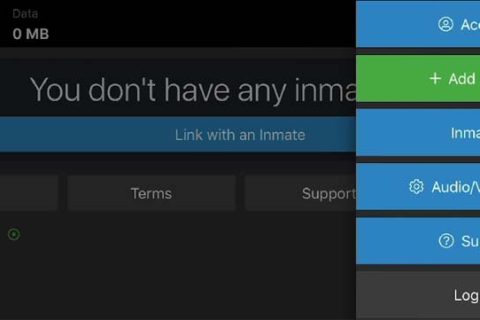
1. Why Can’t You Find the Inmate You Want to Link With?
Sometimes, you cannot find an inmate when you want to link your account. If you need to face it, there may be two reasons why it happens, including:
- The inmate you’re looking for might have been released from the facility or has been moved to another facility that does not use Cidnet’s system. If a new facility uses Cidnet, you can choose the facility in Cidnet when you’re trying to link with an inmate.
- The facility has not yet added the inmate to Cidnet’s system.
For the best solution, you can contact the facility directly to get further information about the inmate you want to connect with.
2. Why Did Your Video CUE Cut Out?
When you’re doing a video CUE session, it may sometimes cut out early. If it happens, you may have to check your internet connection. If you use Wi-Fi, make sure to have a stable connection and a good signal. It would be better for you to stand somewhere near your router and make sure to limit your movement when the video CUE is in progress.
4. Why Was Your Device Not Supported?
If you receive a Cidnet notification that says “device not supported,” you can try to check your browser. If you do not use Google Chrome, you can select it as your browser. In addition, you also need to ensure that you’ve allowed the browser access to your microphone and camera.
5. Why Did Your Video CUE Lose Connection?
If your video CUE immediately loses connection, it may be due to an internet connection. It’s highly recommended that you use a strong Wi-Fi or Ethernet connection. Make sure to minimize your movement while doing a video CUE. However, you will only be charged for the amount of data you use, so you can refund unused data once the CUE has been processed.
6. Your Video CUE Never Started, Why Are You Seeing the CUE is Complete?
If you’re seeing the notification that your video CUE is complete but you never start it, it can be because the inmate failed to start the video CUE. You should know that the inmate really has a limited amount of time to log into the device. If the inmate cannot login, the video CUE will be automatically canceled, and you may have to reschedule it.
7. Why Was Your Card Declined?
It’s important to note that Cidnet is not responsible for declining your transaction; either your card may be declined for suspected fraud or low funds. To find out whether a hold has been placed on your card, you may have to contact your bank. If a hold has been put on your card, it may have to be removed before you can continue buying data for your account.
8. Why Was Your Card Declined Because of an Address Issue or an AVS Mismatch?
The issue may arise if you have recently moved but still use your former address. To prevent it, you need to verify that you’ve entered the billing address that your card is associated with.
Keep in mind that you will be locked out indefinitely if your card is declined in Cidnet too many times. If it happens, you can try to buy a prepaid Visa card and ensure that you register the Visa at the correct address before you try to buy data.
9. You Really Need Help. What Number Can You Call for Cidnet Customer Support?
If you really want to call Cidnet’s customer support to ask for help, you can call them at (888) 984-1903. When calling this number, you can choose prompt 2 and leave a detailed message, including your name, phone number, email address, and the facility where the inmate is incarcerated. Make sure to tell them if you’ve already created an account. Of course, Cidnet’s support team will promptly reach out to you to help.
Okay, those are some questions and issues that many users often ask Cidnet. For more help, you can try to submit a ticket that you can send to Cidnet’s customer support. Make sure to clearly explain what you’re facing with Cidnet.

A bookworm and researcher especially related to law and citizenship education. I spend time every day in front of the internet and the campus library.